生物传感器(英)

邓盛元、万莹、汪俊松、李大力

目录

  • 1 INTRODUCTION / 绪论
    • 1.1 Introduction of Biosensors / 生物传感器概论
      • 1.1.1 Presentation / 课程讲义
      • 1.1.2 Video / 课程视频
      • 1.1.3 Narratives / 视频文本
      • 1.1.4 Retrospect / 要点回顾
    • 1.2 Classification of Biosensors / 生物传感器的类型
      • 1.2.1 Presentation / 课程讲义
      • 1.2.2 Video / 课程视频
      • 1.2.3 Narratives / 视频文本
      • 1.2.4 Retrospect / 要点回顾
    • 1.3 Supplementary Materials / 补充学习
    • 1.4 Quiz and Homework / 作业测验
  • 2 SURFACE IN BIOSENSORS / 生物传感器的表界面科学
    • 2.1 Surface Chemistry / 表面化学
      • 2.1.1 Presentation / 课程讲义
      • 2.1.2 Video / 课程视频
      • 2.1.3 Narratives / 视频文本
      • 2.1.4 Retrospect / 要点回顾
    • 2.2 Biosensing Interfaces / 生物传感界面
      • 2.2.1 Presentation / 课程讲义
      • 2.2.2 Video / 课程视频
      • 2.2.3 Narratives / 视频文本
      • 2.2.4 Retrospect / 要点回顾
    • 2.3 Supplementary Materials / 补充学习
    • 2.4 Quiz and Homework / 作业测验
  • 3 PROTEIN SENSORS / 蛋白质传感器
    • 3.1 ELISA and Immunofluorescence / 酶联免疫吸附分析与免疫荧光法
      • 3.1.1 Presentation / 课程讲义
      • 3.1.2 Video / 课程视频
      • 3.1.3 Narratives / 视频文本
      • 3.1.4 Retrospect / 要点回顾
    • 3.2 Aptamer and Catalysis Based Biosensors / 基于适配体与催化的生物传感器
      • 3.2.1 Presentation / 课程讲义
      • 3.2.2 Video / 课程视频
      • 3.2.3 Narratives / 视频文本
      • 3.2.4 Retrospect / 要点回顾
    • 3.3 Supplementary Materials / 补充学习
    • 3.4 Quiz and Homework / 作业测验
  • 4 DNA SENSORS / DNA传感器
    • 4.1 Nucleic Acid Biomarkers and Sequencing / 核酸标志物及测序
      • 4.1.1 Presentation / 课程讲义
      • 4.1.2 Video / 课程视频
      • 4.1.3 Narratives / 视频文本
      • 4.1.4 Retrospect / 要点回顾
    • 4.2 DNA Detection and Amplification / DNA检测与信号放大
      • 4.2.1 Presentation / 课程讲义
      • 4.2.2 Video / 课程视频
      • 4.2.3 Narratives / 视频文本
      • 4.2.4 Retrospect / 要点回顾
    • 4.3 Supplementary Materials / 补充学习
    • 4.4 Quiz and Homework / 作业测验
  • 5 EXPERIMENTATION / 实验内容
    • 5.1 List of Experiments / 实验列表
    • 5.2 In-Class Demo 1 / 课内实验1
    • 5.3 In-Class Demo 2 / 课内实验2
    • 5.4 Out-of-Class Demo 1 / 课外实验1
    • 5.5 Out-of-Class Demo 2 / 课外实验2
    • 5.6 Out-of-Class Demo 3 / 课外实验3
    • 5.7 Out-of-Class Demo 4 / 课外实验4
    • 5.8 Out-of-Class Demo 5 / 课外实验5
    • 5.9 Out-of-Class Demo 6 / 课外实验6
  • 6 WRITING ASSIGNMENT / 课程报告
    • 6.1 Project I / 项目I
    • 6.2 Project II / 项目II
  • 7 SUPPORTING INFO / 支持信息
    • 7.1 Syllabus / 教学大纲
    • 7.2 Schedule / 教学实施计划
    • 7.3 Apps / 智能应用
    • 7.4 References / 参考文献
    • 7.5 Textbooks / 参考教材
    • 7.6 Network Resources / 网络资源
Out-of-Class Demo 4 / 课外实验4

Photolithography


Pay attention to all the process parameters (how long is the piranha wet etch; what is the exposure time for a given UV exposure system). These parameters may not be given in the data sheet and depend on where you are going to perform the photolithography steps. You will need these parameters for “debugging” if the process goes wrong. The following are 2 protocols developed by your fellow classmates.


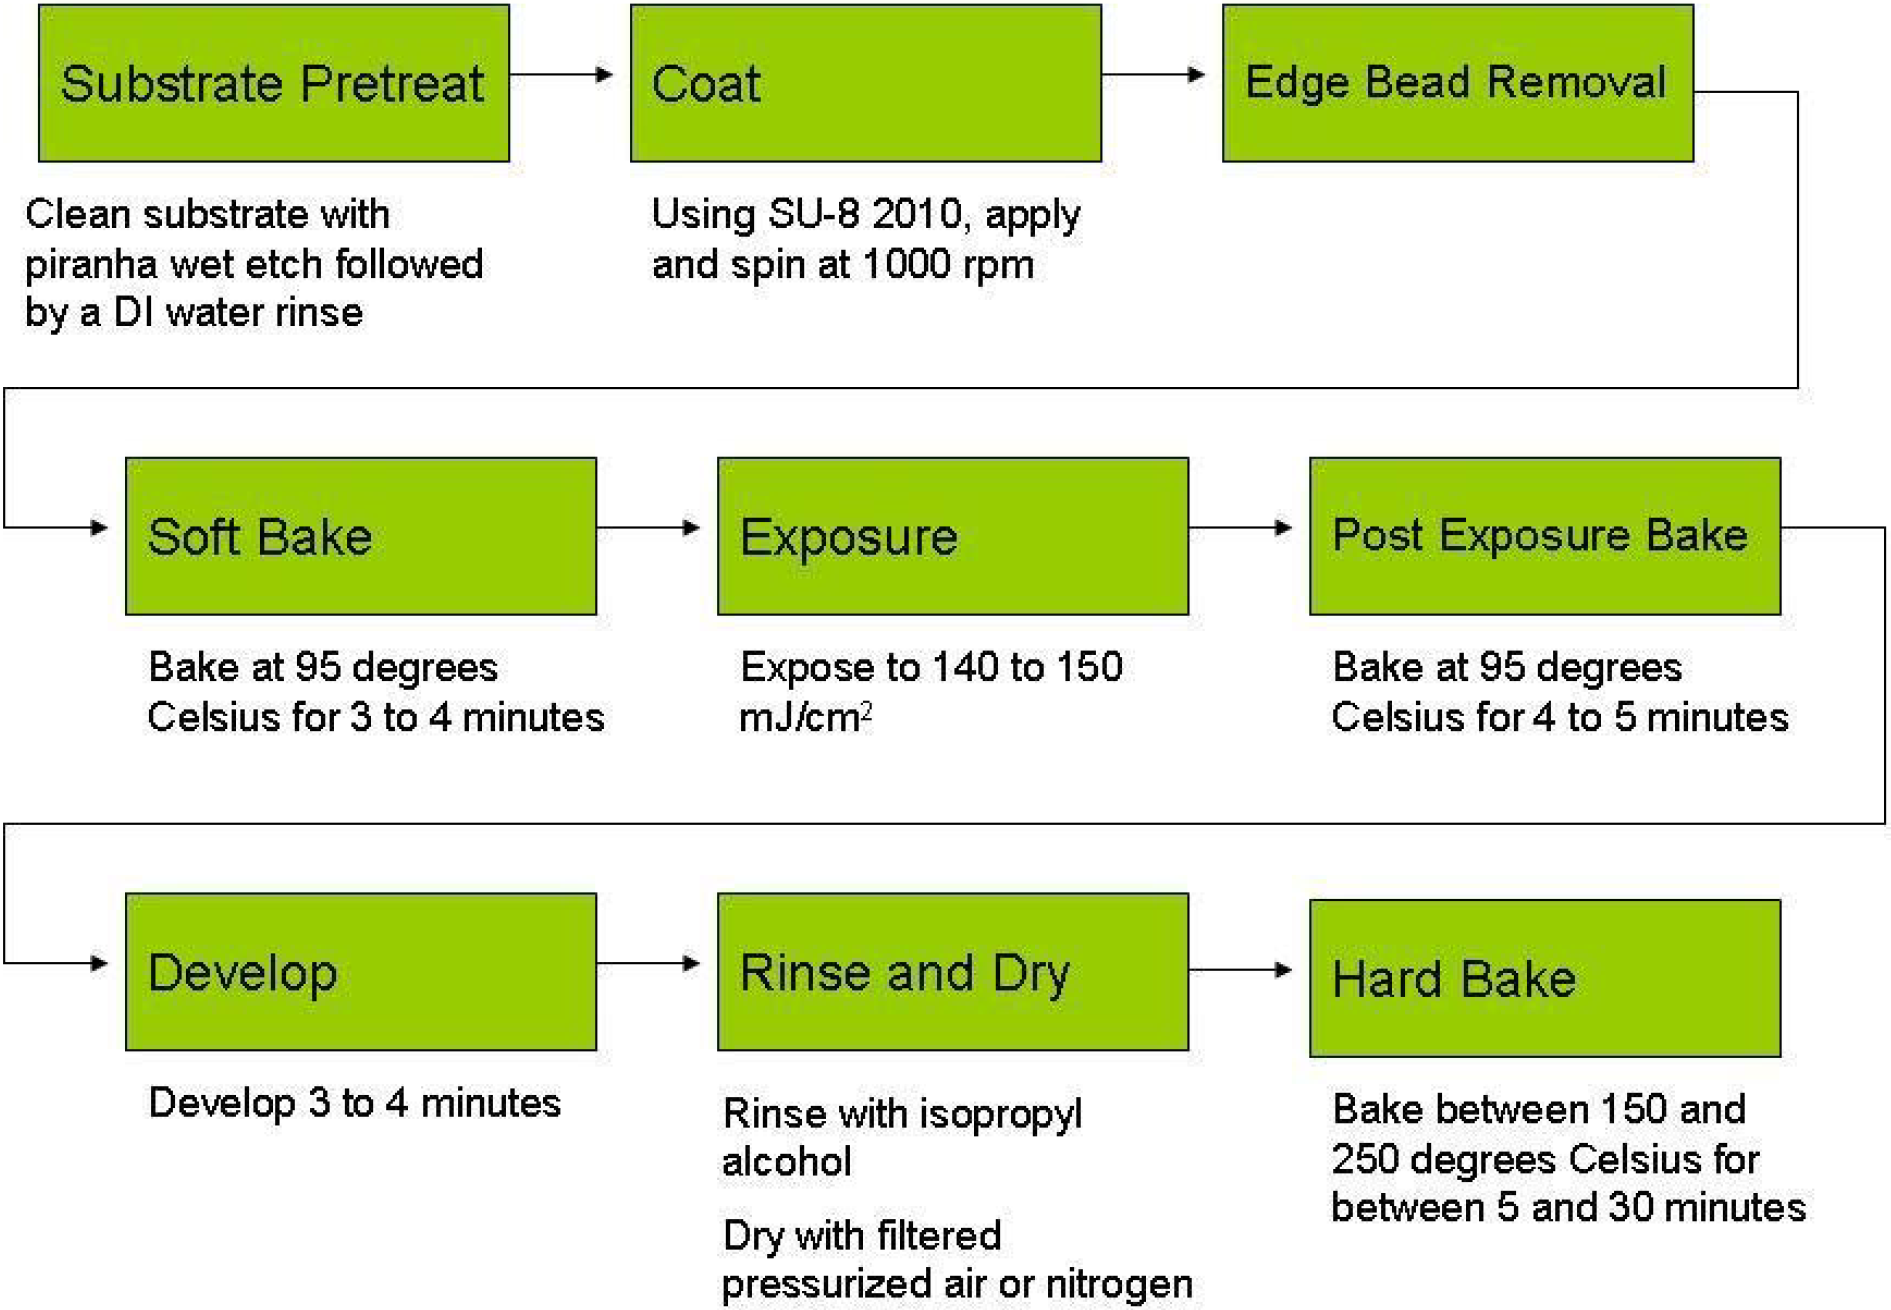
SU-8 Protocol Recipe #1

01   Substrate Preparation: Clean Substrate

Using piranha wet etch (H2SO4 and H2O2)

Using De-ionized water rinse

02   Coat SU-8

Using SU-8 2015 spin at 2000 rpm for 30 s with accelerationof 300 rpm/s

03   Edge Bead Removal (EBR)

Using small stream of solvent (MicroChem’s EBR PG) to remove thick bead

04   Soft Bake

Using a uniformity thermal hotplate to warm the soft bake

Soft bake for 3~4 min and control temperature at 95 °C

Remove wafer and Cool down wafer to room temperature

Return wafer to hotplate and repeat cool down and heat up to remove “wrinkle”

05   Exposure

Expose wafer under Ultraviolet at the wavelength of 350 nm

Exposure energy is 140~160 mJ/cm2

For silicon wafer, we choose 1X dose

06   Post Exposure Bake

Using hotplate to back wafer for 4~5 min at 95 °C

07   Development

Using MicroChem’s as SU-8 developer to develop SU-8 for 3~4 min

08   Rinse and Dry

Spray and wash the developed wafer with fresh solution for 10 s

Second spray and wash with Isopropyl Alcohol for 10 s

Using pressure air with filter (or N2) to dry wafer

09   Hard Bake (Optional)

Hard bake wafer 150 °C for 5~30 min to anneal any crack

10   Removal (Optional)

Using MicroChem’s Remover PG with OmniCoat to lift off SU-8

Control temperature at 50~80 °C and immerse wafer for 30~90 min in Remover.

Also can use Plasma removal (200 W, 80 sccm O2, 8 sccm CF4, 100 mtorr, 10 °C)


SU-8 Protocol Recipe #2