
-
1 任务描述
-
2 知识准备1
-
3 知识准备2
-
4 跟我学
-
5 任务实施
-
6 跟我做
了解了项目实体对象的划分和数据表的设计,针对每一个实体对象都要设计一个类,这种实体类可以放在公共类中实现。本任务针对项目前期的需求分析和系统设计,实现公共类。
一、环境搭建
1、下载并安装JDK
打开Oracle的官网www.oracle.com,在下载板块中的Java for Developers区域找到JDK和JRE的下载链接。
2、测试安装是否成功
在命令提示符窗口中使用java ,javac ,java -version命令,如果安装成功,则显示JDK版本等信息。如图:

3、设置环境变量
在命令提示符窗口中使用javac命令, 如果出现该命令的参数选项,说明环境变量设置成功,JDK可正常使用。
4、集成开发工具的下载和使用
Eclipse的下载可访问其官方网站www.eclipse.org,在Eclipse IED频道找到“Eclipse IDE for Java Developers”板块,下载最新版本的Eclipse并安装。
Eclipse Mars 4.5(Windows 64位版)免安装版下载链接:
IntelliJ IDEA 2020.3.2 社区版下载链接:
二、类的设计
1、如何设计一个类?
给类起一个名称,名词性的,有意义,用单词构成,首字母大写,其后驼峰式命名。
2、如何创建一个类?
类的创建语法:
class 类名{
[ 修饰符] 数据类型 变量名 [ = 变量值 ]; //属性(成员变量、实例变量)
……
[ 修饰符] 返回值类型 方法名 (形参列表 ) { //方法(实例方法)
语句;
}
……
}
对象的创建语法:
类名 对象名=new 类名();
3、方法
(1)什么是方法
假设有一个游戏程序,程序在运行过程中,要不断地发射炮弹。发射炮弹的动作需要编写100行的代码,在每次实现发射炮弹的地方都需要重复地编写这100行代码,这样程序会变得很臃肿,可读性也非常差。
为了解决代码重复编写的问题,可以将发射炮弹的代码提取出来放在一个{}中,并为这段代码起个名字,这样在每次发射炮弹的地方通过这个名字来调用发射炮弹的代码就可以了。
上述过程中,所提取出来的代码可以被看作是程序中定义的一个方法,程序在需要发射炮弹时调用该方法即可。
(2)方法的声明和调用
声明一个方法的语法格式如下:
修饰符 返回值类型 方法名([参数类型 参数名1,参数类型 参数名2,...]);
调用方法的格式如下:
参数名([实际参数1,实际参数2,...]);
修饰符:是对访问权限的限定,例如,public、static都是修饰符
返回值类型:用于限定方法返回值的数据类型
参数类型:用于限定调用方法时传入参数的数据类型
参数名:是一个变量,用于接收调用方法时传入的数据
return关键字:用于结束方法以及返回方法指定类型的值
返回值:被return语句返回的值,该值会返回调用者
例如:定义一个求矩形面积的方法getArea(),在main()中调用方法并打印结果。
public class Sample3_1{
public static void main(String[] args){
int area=getArea(3,5);
}
public static int getArea(int x,int y){
int s=x*y;
return s;
}
}
(3)方法的重载
Java允许在一个程序中定义多个名称相同的方法,但是参数的类型或个数必须不同,这就是方法的重载。
例如:定义方法实现两个整数相加、两个小数相加和两个字符串的连接。
public class Sample3_1{
public static void main(String[] args){
int sum1=add(3,5);
int sum2=add(1.3,2.5);
String sum3=add("Hello"," Java");
}
public static int add(int x,int y){
int sum=x+y;
return sum;
}
public static double add(double x, double y){
double sum=x+y;
return sum;
}
public static String add(String x,String y){
String sum=x+y;
return sum;
}
}
4、如何实现封装?
定义一个类时,将类中的属性私有化,即使用private关键字来修饰,私有属性只能在它所在类中被访问,如果外界想要访问私有属性,需要提供一些使用public修饰的公有方法,其中包括用于获取属性值的getXxx方法和设置属性值的setXxx方法。
一、基本组件
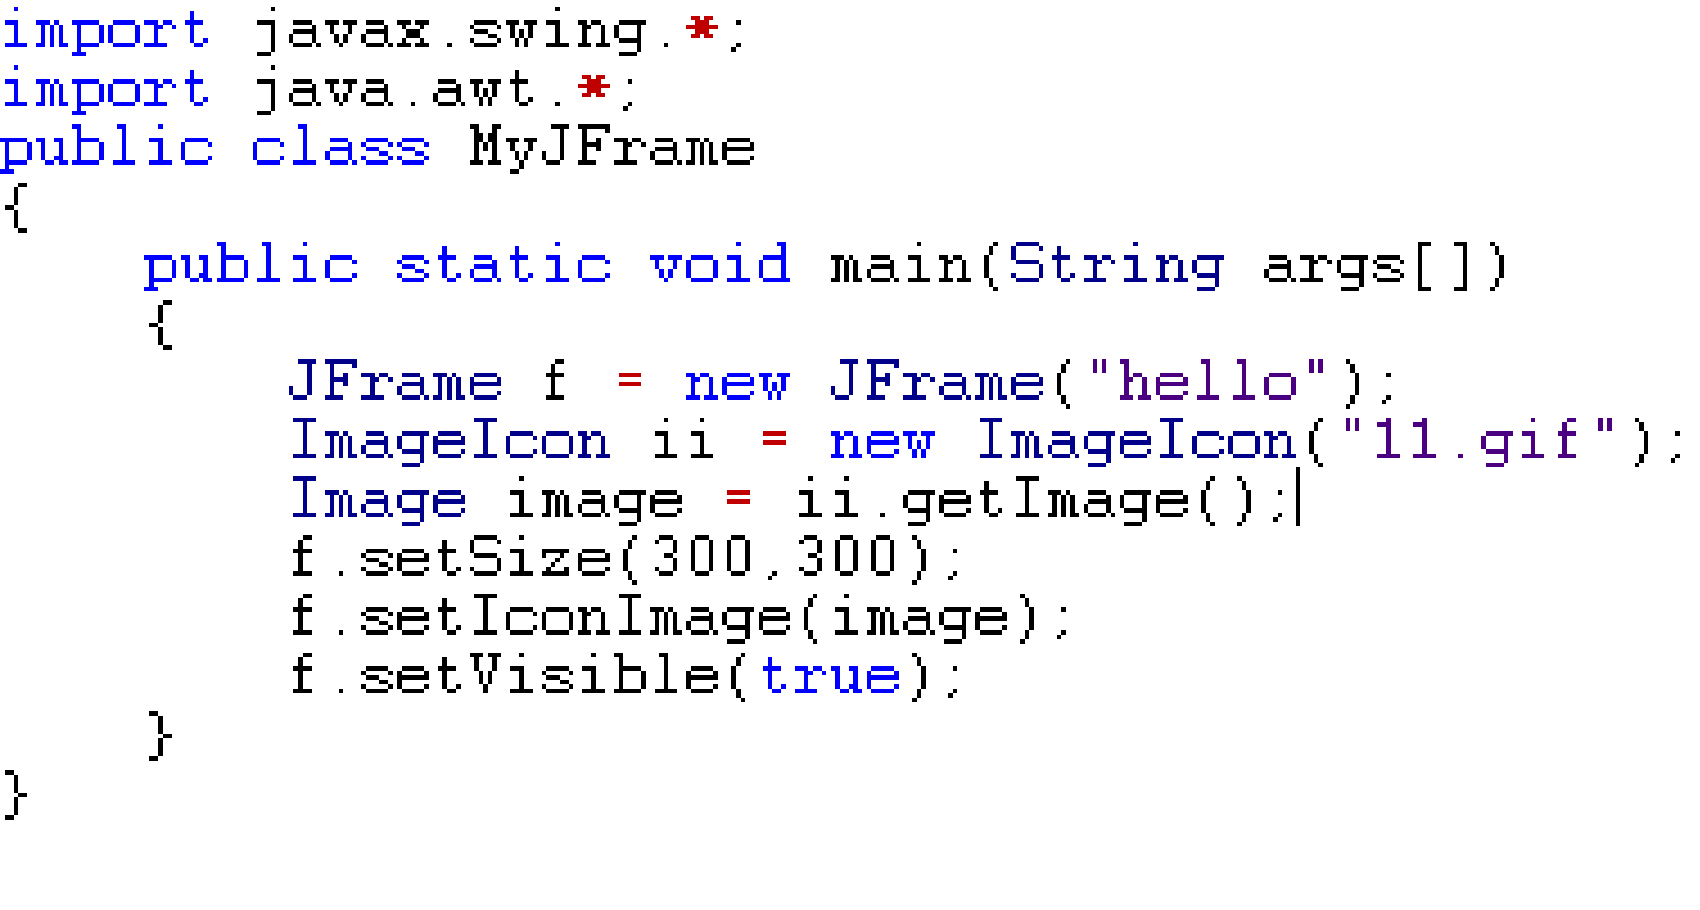
1、JFrame
构造方法
JFrame() 创建无标题窗口。
JFrame(String s) 创建标题名字是字符串s的窗口。
常用方法
get/setTitle(String title) 设置JFrame标题文本
get/ setSize():获取/设置JFrame的大小。
add(Object a):将组件添加到JFrame中。
dispose()关闭JFrame并回收用于创建窗口的任何资源。
setVisible(boolean b)设置JFrame的可见性。
setLocation(x,y) 设置JFrame在屏幕的位置
setLayout() getContentPane() pack()
案例:
2、JPanel
特点:不能单独存在,只能存放于其他容器中。
无边框,不能被移动、缩放、关闭。
JPanel() 创建具有双缓冲和流布局的新 JPanel
JPanel(LayoutManager layout) 创建具有指定布局管理器的新缓冲 JPanel。
setLayout(LayoutManager layout) 设置具有指定布局管理器的新缓冲 JPanel。
3、JLabel
标签:显示单行静态文本或图片。
用户只能查看内容,不能进行修改。没有事件响应。
构造方法(有无参构造)
JLabel label1 = new JLabel(“姓名”); //显示文本
ImageIcon ii = new ImageIcon(“java.gif”);
JLabel label2 = new JLabel(ii); //显示图标
JLabel label3 = new JLabel(“姓名”,ii, JLabel.CENTER);
//显示图标和文本、对齐方式
4、JButton
构造方法(有无参构造)
JButton button1 = new JButton(“姓名”);
ImageIcon ii = new ImageIcon(“java.gif”);
JButton button2 = new JButton(ii);
JButton button3 = new JButton(“姓名”,ii);
常用方法
void setActionCommand(String);
void addActionListener(ActionListener);
5、JTextField
文本框:能够接受用户的键盘输入的单行文本。
构造方法(有无参构造)
JTextField tf1 = new JTextField(10); //文本域长度
JTextField tf2 = new TextField(“aa”); //文本域初始内容
JTextField tf3 = new JTextField(“aa”,8);
其它方法
public String getText()
public String getSelectedText()
public void setText(String s)
public void getColumns() //返回文本域列数
public void setEditable(boolean b)//设置文本域是否只读
二、布局管理器
定义:确定容器中组件的位置和大小。
实现:AWT中定义了布局管理器接口LayoutManager,它的实现类可以自动根据运行平台的不同来布置各种组件。
说明:每个容器组件都有自己的默认布局管理器,或通过setLayout方法设置为其他布局。
布局是指组件在容器中的排列方式,主要有:
FlowLayout 流式布局
BorderLayout 边界布局
GridLayout 网格布局
CardLayout 卡片布局
BoxLayout 盒式布局
GridBagLayout 网格包布局
null 空布局(不使用布局)
注:对于一些复杂的情况,往往需要使用容器的嵌套,各容器可使用不同的布局。当容器的尺寸改变时,布局管理器会自动调整组件的排列
1、流布局
以行为单位依次排列各组件,一行排不下时,另起一行。
JPanel的默认布局是FlowLayout。
构造方法:
FlowLayout();
FlowLayout(int align); //align一般取值有:FlowLayout.CENTER(默认值)、FlowLayout.LEFT、FlowLayout.RIGHT
FlowLayout(int align,int hgap,int vgap); //hgap和vgap指定组件与容器起始边界以及组件间的水平和垂直间距,默认值为5个像素。
如:FlowLayout layout = new FlowLayout(FlowLayout.LEFT, 10, 10);
主要方法:
getAlignment(); //返回对齐方式
getHgap(); //返回组件水平间距 getVgap(); //返回组件垂直间距
setAlignment();
setHgap(); setVgap();

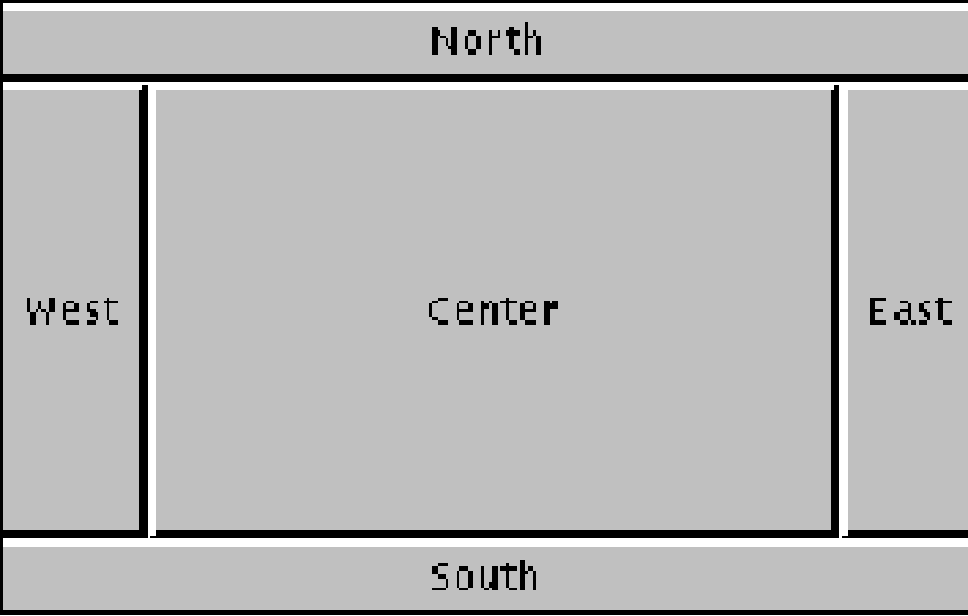
2、边界布局
按照东、西、南、北、中5个方位排列各组件
顶层容器JFrame、JApplet、JDialog、JWindow的默认布局都是BorderLayout
构造方法:
BorderLayout();
BorderLayout(int hgap,int vgap); //hgap和vgap指定组件间的水平和垂直间距,默认值为0个像素
例如:BorderLayout lay1 = new BorderLayout();
BorderLayout lay2 = new BorderLayout(10, 10);
主要方法:
getHgap(); getVgap();
setHgap(); setVgap();
BorderLayout的使用:
创建BorderLayout布局对象 BorderLayout l = new BorderLayout();
创建容器对象 JPanel panel = new JPanel();
设置容器对象的布局或使用默认布局 panel.setLayout(l);
向容器中添加组件对象(设组件对象已创建) panel.add(组件对象,方位);
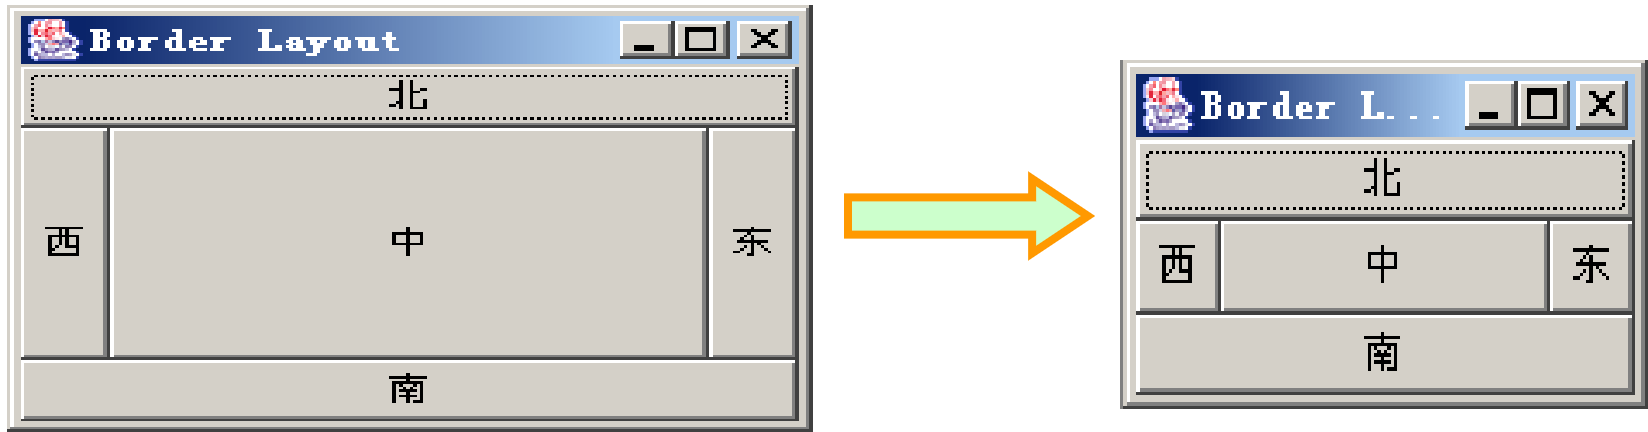
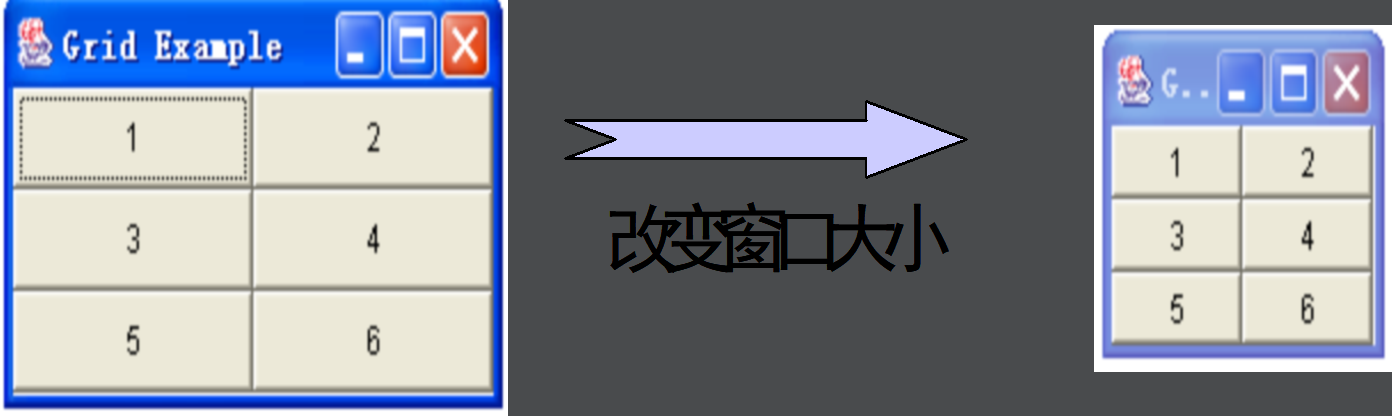
3、网格布局
按照二维网格以相同大小依次排列各组件,m行n列
构造方法
GridLayout(); //一行、每个组件一列
GridLayout(int rows,int cols); //行列数
GridLayout(rows,cols,int hgap,int vgap); //行行、列列的间距,默认值为0个像素
例如:GridLayout lay1 = new GridLayout(3,3);
GridLayout lay2 = new GridLayout(5,2,10,10);
主要方法
getHgap(); getVgap();
setHgap(); setVgap();
getRows(); getColumns();
setRows(); setColumns();
4、绝对布局
作用:精确指定各个组建的大小和位置
1) setLayout(null)
2) 调用组件setBounds(int x, int y, int width,int height)设置组件在容器中的大小和位置,单位像素。
案例:实现如下图所示界面。
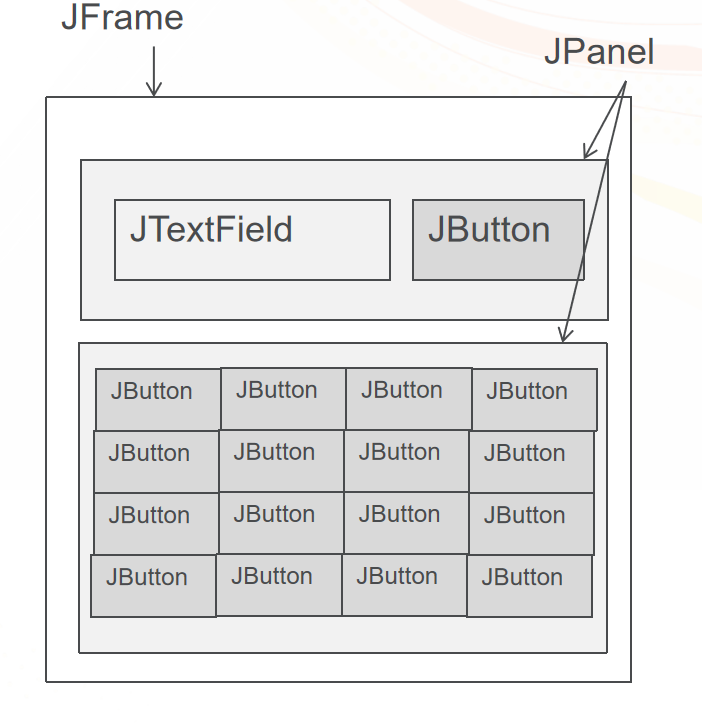
代码:
f = new JFrame("计算器v1.1");
tf = new JTextField("0", 10);
tf.setFont(new Font("宋体", Font.BOLD, 64));
tf.setEditable(false);
tf.setHorizontalAlignment(JTextField.RIGHT);
clean = new JButton("清空");
clean.setFont(new Font("楷体", Font.BOLD, 48));
butt = new JButton[16];
String str = "123+456-789*0.=/";
for(int i = 0;i<butt.length;i++) {
butt[i] = new JButton(str.charAt(i)+"");
butt[i].setFont(new Font("宋体",Font.BOLD,36));
}
JPanel p1 = new JPanel();
JPanel p2 = new JPanel();
p1.add(tf);
p1.add(clean);
p2.setLayout(new GridLayout(4,4));
for(int i = 0;i<butt.length;i++) {
p2.add(butt[i]);
}
f.add(p1,BorderLayout.NORTH);
f.add(p2,BorderLayout.CENTER);
f.setVisible(true);
f.setSize(600, 600);
f.setLocation(500, 600);
f.setDefaultCloseOperation(JFrame.EXIT_ON_CLOSE);
5、层次布局
GroupLayout 是一个 LayoutManager,将组件按层次分组,决定它们在 Container 中的位置。GroupLayout 主要供生成器使用,但也可以手工编码。分组由 Group 类的实例来完成。GroupLayout 支持两种组。串行组 (sequential group) 按顺序一个接一个地放置其子元素。并行组 (parallel group) 能够以四种方式对齐其子元素。
每个组可以包含任意数量的元素,其中元素有 Group、Component 或间隙 (gap)。间隙可被视为一个具有最小大小、首选大小和最大大小的不可见组件。此外,GroupLayout 还支持其值取自 LayoutStyle 的首选间隙。
本项目页面布局中多次用到层次布局。举例如下:
setDefaultCloseOperation(JFrame.EXIT_ON_CLOSE);
setBounds(100, 100, 450, 300);
contentPane = new JPanel();
contentPane.setBorder(new EmptyBorder(5, 5, 5, 5));
setContentPane(contentPane);
JButton btnNewButton = new JButton("按钮1");
JButton btnNewButton_1 = new JButton("按钮二");
JButton btnNewButton_2 = new JButton("按钮三");
JButton btnNewButton_3 = new JButton("按钮四");
GroupLayout gl_contentPane = new GroupLayout(contentPane);
gl_contentPane.setHorizontalGroup(
gl_contentPane.createParallelGroup(Alignment.LEADING)
.addGroup(gl_contentPane.createSequentialGroup()
.addContainerGap()
.addGroup(gl_contentPane.createParallelGroup(Alignment.LEADING)
.addGroup(gl_contentPane.createSequentialGroup()
.addComponent(btnNewButton)
.addPreferredGap(ComponentPlacement.RELATED, 274, Short.MAX_VALUE)
.addComponent(btnNewButton_1))
.addGroup(gl_contentPane.createSequentialGroup()
.addComponent(btnNewButton_2)
.addPreferredGap(ComponentPlacement.RELATED, 244, Short.MAX_VALUE)
.addComponent(btnNewButton_3)))
.addContainerGap())
);
gl_contentPane.setVerticalGroup(
gl_contentPane.createParallelGroup(Alignment.LEADING)
.addGroup(gl_contentPane.createSequentialGroup()
.addContainerGap()
.addGroup(gl_contentPane.createParallelGroup(Alignment.BASELINE)
.addComponent(btnNewButton_1)
.addComponent(btnNewButton))
.addPreferredGap(ComponentPlacement.RELATED, 187, Short.MAX_VALUE)
.addGroup(gl_contentPane.createParallelGroup(Alignment.BASELINE)
.addComponent(btnNewButton_2)
.addComponent(btnNewButton_3))
.addContainerGap())
);
contentPane.setLayout(gl_contentPane);
基本组件的使用视频如下:
容器组件的使用视频如下:
在Eclipse中创建一个Java工程,讲项目所需JAR包导入项目中的lib文件夹下。本项目使用JDBC连接数据库,因此需要导入MySQL驱动的JAR包。
另外需要导入一个jxl.jar包,该包是通过Java操作EXCEL表格的工具类库,能够修饰单元格属性,是由java语言开发而成的。
然后,在工程的src文件夹下创建包,分别命名为dao、view、model和systemUtil。项目结构目录如图所示。
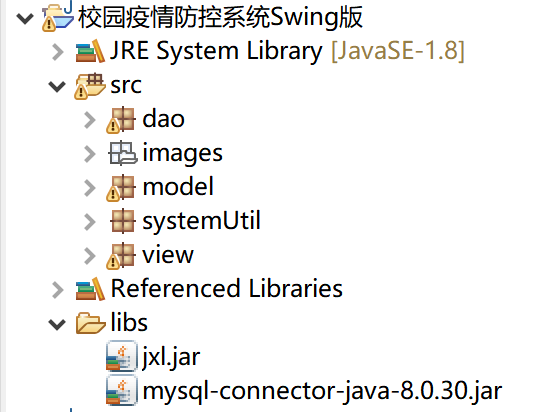
各个包下的文件归类具体如下:
dao包下的Java文件为与数据库进行交互的类。
model包下的Java文件为实体类。
systemUtil包下的Java文件为项目中所用到的工具类。
view包下的Java文件为UI界面类。
经过对项目的实体对象的划分和数据表的设计,针对每一个实体对象都要设计一个类。下面分别介绍实体类的设计。
1、学生用户实体类
在model包下新建Student类,用于描述学生用户实体。在Student类中声明属性
stuid, name, age, stuclass, stusex, stuname, password,并编写对应的getter和setter方法。Student类具体实现如文件4-1所示。
文件4-1 Student.java
public class Student {
String stuid;//学号
String name;//姓名
int age;//年龄
String stuclass;//班级
String sex;//性别
String stuname;//账号
String password;//密码
public Student(String stuid, String name, int age, String stuclass, String stusex, String stuname, String password) {
super();
this.stuid = stuid;
this.name = name;
this.age = age;
this.stuclass = stuclass;
this.sex = stusex;
this.stuname = stuname;
this.password = password;
}
public Student() {
super();
// TODO 自动生成的构造函数存根
}
public String getStuid() {
return stuid;
}
public void setStuid(String stuid) {
this.stuid = stuid;
}
public String getName() {
return name;
}
public void setName(String name) {
this.name = name;
}
public int getAge() {
return age;
}
public void setAge(int age) {
this.age = age;
}
public String getStuclass() {
return stuclass;
}
public void setStuclass(String stuclass) {
this.stuclass = stuclass;
}
public String getSex() {
return sex;
}
public void setSex(String sex) {
this.sex = sex;
}
public String getStuname() {
return stuname;
}
public void setStuname(String stuname) {
this.stuname = stuname;
}
public String getPassword() {
return password;
}
public void setPassword(String password) {
this.password = password;
}
}
2、用户实体类
在model包下新建User类,用于描述用户实体,包括教师和学生用户角色。在User类中声明属性id、 name、 passWord、iden表示身份,并编写对应的getter和setter方法。User类具体实现如文件4-2所示。
文件4-2 User.java
public class User {
String id;//id
String name;//用户名
String passWord;//密码
String iden;//身份
public User() {
}
public User(String name, String passWord) {
super();
this.name = name;
this.passWord = passWord;
}
public User(String name, String passWord, String iden) {
super();
this.name = name;
this.passWord = passWord;
this.iden = iden;
}
public String getIden() {
return iden;
}
public void setIden(String iden) {
this.iden = iden;
}
public String getId() {
return id;
}
public void setId(String id) {
this.id = id;
}
public String getName() {
return name;
}
public void setName(String name) {
this.name = name;
}
public String getPassWord() {
return passWord;
}
public void setPassWord(String passWord) {
this.passWord = passWord;
}
}
3、校园新闻实体类
在model包下新建News类,用于描述校园通知和疫情资讯信息。在News类中声明属性nid、ntime、 title、 news,并编写对应的getter和setter方法。News类具体实现如文件4-3所示。
文件4-3 News.java
public class News {
String nid;//新闻ID
String ntime;//发布时间
String title;//标题
String news;//内容
public News(String ntime, String title, String news) {
super();
this.ntime = ntime;
this.title = title;
this.news = news;
}
public News(String nid, String ntime, String title, String news) {
super();
this.nid = nid;
this.ntime = ntime;
this.title = title;
this.news = news;
}
public News() {
}
public String getNid() {
return nid;
}
public void setNid(String nid) {
this.nid = nid;
}
public String getTitle() {
return title;
}
public void setTitle(String title) {
this.title = title;
}
public String getNtime() {
return ntime;
}
public void setNtime(String ntime) {
this.ntime = ntime;
}
public String getNews() {
return news;
}
public void setNews(String news) {
this.news = news;
}
}
4、每日填报记录实体类
在model包下新建DailyRecord类,用于描述学生每日填报记录的字段属性。在User类中声明属性id、 subtime、 tem、 cou、high、 color、heapath、 trippath,并编写对应的getter和setter方法。DailyRecord类具体实现如文件4-4所示。
文件4-4 DailyRecord.java
public class DailyRecord {
String id;//学生id
String name;//学生姓名
String subtime;//填报时间
float tem;//体温
String cou;//咳嗽发烧
String high;//高风险
String color;//双码颜色
String heapath;//健康码地址
String trippath;//行程码地址
public DailyRecord(String id, String subtime, float tem, String cou, String high, String color,
String heapath, String trippath) {
super();
this.id = id;
this.subtime = subtime;
this.tem = tem;
this.cou = cou;
this.high = high;
this.color = color;
this.heapath = heapath;
this.trippath = trippath;
}
public DailyRecord(String id, String subtime, float tem, String cou, String high, String color) {
super();
this.id = id;
this.subtime = subtime;
this.tem = tem;
this.cou = cou;
this.high = high;
this.color = color;
}
public DailyRecord(String id, String name, String subtime, float tem, String cou, String high, String color) {
super();
this.id = id;
this.name = name;
this.subtime = subtime;
this.tem = tem;
this.cou = cou;
this.high = high;
this.color = color;
}
public String getHeapath() {
return heapath;
}
public void setHeapath(String heapath) {
this.heapath = heapath;
}
public String getTrippath() {
return trippath;
}
public void setTrippath(String trippath) {
this.trippath = trippath;
}
public String getName() {
return name;
}
public void setName(String name) {
this.name = name;
}
public String getSubtime() {
return subtime;
}
public void setSubtime(String subtime) {
this.subtime = subtime;
}
public DailyRecord() {
super();
// TODO 自动生成的构造函数存根
}
public String getId() {
return id;
}
public void setId(String id) {
this.id = id;
}
public float getTem() {
return tem;
}
public void setTem(float tem) {
this.tem = tem;
}
public String getCou() {
return cou;
}
public void setCou(String cou) {
this.cou = cou;
}
public String getHigh() {
return high;
}
public void setHigh(String high) {
this.high = high;
}
public String getColor() {
return color;
}
public void setColor(String color) {
this.color = color;
}
}
5、出入校申请实体
在model包下新建ApplySchool类,用于描述学生出校入校申请时提供的字段信息。在User类中声明属性id、 aptime、 item、 applyTime、 applyReason、 state、 dicode、 heapath、 trippath,并编写对应的getter和setter方法。ApplySchool类具体实现如文件4-5所示。
文件4-5 ApplySchool.java
public class ApplySchool {
String id;//申请ID
String stuname;//学生姓名
String stuclass;//班级
String aptime;//提交申请的时间
String item;//申请事项
String applyTime;//申请时间
String applyReason;//申请理由
String state;//申请状态
String teaReason;//驳回理由
String dicode;//双码颜色
String heapath;//健康码地址
String trippath;//行程码地址
public ApplySchool(String id, String aptime, String item, String applyTime, String applyReason, String state,
String dicode, String heapath, String trippath) {
super();
this.id = id;
this.aptime = aptime;
this.item = item;
this.applyTime = applyTime;
this.applyReason = applyReason;
this.state = state;
this.dicode = dicode;
this.heapath = heapath;
this.trippath = trippath;
}
public ApplySchool(String id, String stuname, String stuclass, String aptime, String item, String applyTime,
String applyReason, String state, String teaReason, String dicode) {
super();
this.id = id;
this.stuname = stuname;
this.stuclass = stuclass;
this.aptime = aptime;
this.item = item;
this.applyTime = applyTime;
this.applyReason = applyReason;
this.state = state;
this.teaReason = teaReason;
this.dicode = dicode;
}
public ApplySchool(String id, String stuname, String stuclass, String aptime, String item, String applyTime,
String applyReason, String state) {
super();
this.id = id;
this.stuname = stuname;
this.stuclass = stuclass;
this.aptime = aptime;
this.item = item;
this.applyTime = applyTime;
this.applyReason = applyReason;
this.state = state;
}
public ApplySchool(String id, String aptime, String item, String applyTime, String applyReason, String state,
String dicode) {
super();
this.id = id;
this.aptime = aptime;
this.item = item;
this.applyTime = applyTime;
this.applyReason = applyReason;
this.state = state;
this.dicode = dicode;
}
public ApplySchool(String id, String aptime, String item, String applyTime, String applyReason, String state) {
super();
this.id = id;
this.aptime = aptime;
this.item = item;
this.applyTime = applyTime;
this.applyReason = applyReason;
this.state = state;
}
public ApplySchool() {
}
public String getHeapath() {
return heapath;
}
public void setHeapath(String heapath) {
this.heapath = heapath;
}
public String getTrippath() {
return trippath;
}
public void setTrippath(String trippath) {
this.trippath = trippath;
}
public String getTeaReason() {
return teaReason;
}
public void setTeaReason(String teaReason) {
this.teaReason = teaReason;
}
public String getDicode() {
return dicode;
}
public void setDicode(String dicode) {
this.dicode = dicode;
}
public String getId() {
return id;
}
public void setId(String id) {
this.id = id;
}
public String getStuname() {
return stuname;
}
public void setStuname(String stuname) {
this.stuname = stuname;
}
public String getStuclass() {
return stuclass;
}
public void setStuclass(String stuclass) {
this.stuclass = stuclass;
}
public String getAptime() {
return aptime;
}
public void setAptime(String aptime) {
this.aptime = aptime;
}
public String getItem() {
return item;
}
public void setItem(String item) {
this.item = item;
}
public String getApplyTime() {
return applyTime;
}
public void setApplyTime(String applyTime) {
this.applyTime = applyTime;
}
public String getApplyReason() {
return applyReason;
}
public void setApplyReason(String applyReason) {
this.applyReason = applyReason;
}
public String getState() {
return state;
}
public void setState(String state) {
this.state = state;
}
}
在项目开发中,除了需要设计实体类,还需要设计一些工具类,用于完成不同的操作。工具类添加到systemUtil包中,下面分别介绍工具类的设计。
1、数据库工具类
在systemUtil包中新建JDBCUtil类,用于获取数据库连接,关闭数据库连接,具体实现如文件4-6所示。
文件4-6 JDBCUtil.java
public class JDBCUtil {
private String stuUrl="jdbc:mysql://localhost:3306/db_campuscontrol";//数据库地址
private String stuUserName="root";//用户名
private String stuPassWord="123456";//密码
private String jdbcName="com.mysql.cj.jdbc.Driver";//驱动名称
public Connection getCon()throws Exception{
Class.forName(jdbcName);
Connection con=DriverManager.getConnection(stuUrl, stuUserName, stuPassWord);
return con;
}
public void closeCon(Connection con)throws Exception{
if(con!=null) {
con.close();
}
}
}
2、字符串工具类
在systemUtil包中新建StringUtil类,用于判断是否是空,判断是否不是空,判断身份,具体实现如文件4-7所示。
文件4-7 StringUtil.java
public class StringUtil {
//判断是否是空
public static boolean isEmpty(String str) {
if(str==null||"".equals(str.trim())) {
return true;
}
else return false;
}
// 判断是否不是空
public static boolean isNotEmpty(String str) {
if(str!=null&&!"".equals(str.trim())) {
return true;
}
else return false;
}
/**
* 判断身份
*/
public static String isIden(String str) {
String iden=null;
if(str.equals("管理员")) {
iden="adminuser";
}else if(str.equals("教师")){
iden="teacheruser";
}else if(str.equals("学生")) {
iden="studentuser";
}
return iden;
}
}
3、图片工具类
在systemUtil包中新建ImageUtil类,用于获取图片地址,具体实现如文件4-8所示。
文件4-8 ImageUtil.java
public class ImageUtil {
/**
* 获取图片地址
*/
public static String getImage() {
JFileChooser jfc = new JFileChooser(FileSystemView.getFileSystemView().getHomeDirectory());
jfc.setDialogTitle("选择图片");
jfc.setAcceptAllFileFilterUsed(false);
//限制文件只能显示PNG格式的图片
FileNameExtensionFilter filter = new FileNameExtensionFilter("PNG images", "png");
jfc.addChoosableFileFilter(filter);
int returnValue = jfc.showOpenDialog(null);
if (returnValue == JFileChooser.APPROVE_OPTION) {
return jfc.getSelectedFile().getPath();
}else {
return "";
}
}
}
配置环境视频如下:
Eclipse使用视频如下:
流布局讲解视频如下:
网格布局讲解视频如下:
关于类的创建视频如下:
封装视频如下:
学生实体的设计视频如下所示:

