
(一)鼠标键盘事件
在Pyton中,tkinter模块的事件event都用字符串描述,格式为:
组件对象.bind(event, handler)
其中,event为事件,handler为处理事件的函数。
鼠标按钮的点击事件的一般格式为:
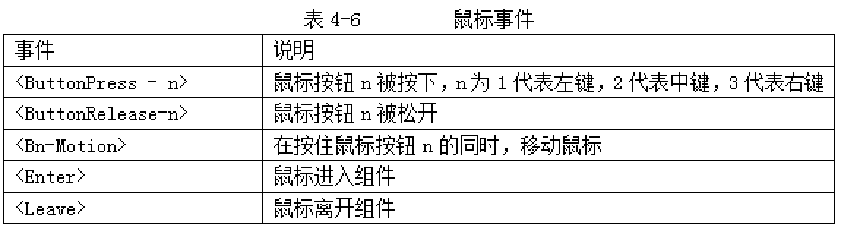
<ButtonPress-n>
其中,n为鼠标按钮,n为1代表左键,2代表中键,3代表右键。
例如,<ButtonPress-1>, 表示按下鼠标的左键。
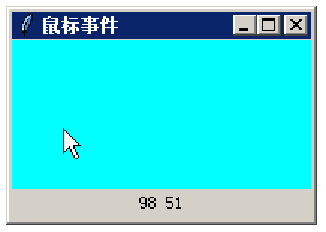
可以通过鼠标事件event来获得鼠标位置。坐标点(event.x,event.y)为发生事件时,鼠标所在的位置。
【例15】编写捕获鼠标点击事件的程序。当鼠标在窗体容器中点击时,记录下其坐标位置。
from tkinter import *
def callback(event):
print( "clicked at:", event.x, event.y)
s = (event.x, event.y)
txt.set(s)
win = Tk()
win.geometry('200x120')
win.title('鼠标事件')
frame = Frame(win, width=200, height=100, bg = 'cyan')
frame.bind("<Button-1>", callback)
frame.pack()
txt = StringVar()
L = Label(win, width=20, textvariable = txt)
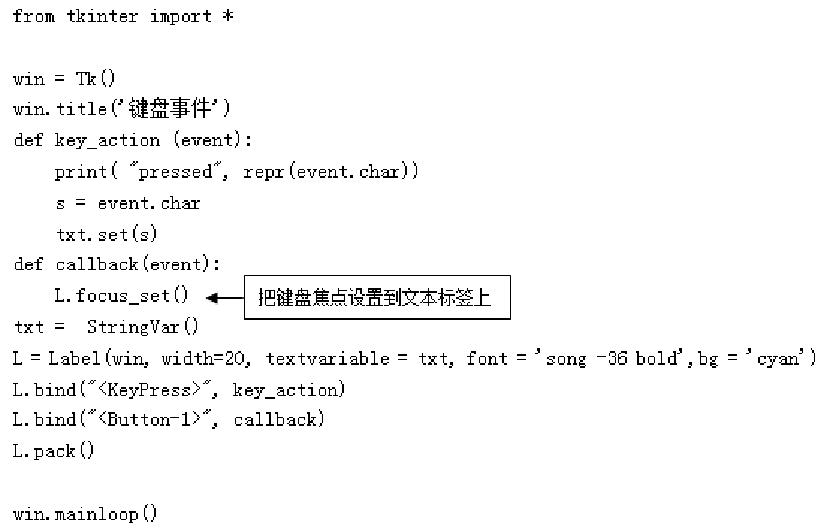
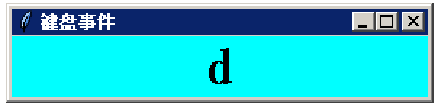
(二)键盘事件

在捕获键盘事件时,先要用focus_set()方法把键盘的焦点设置到一个组件上,这样才能捕获到键盘事件。
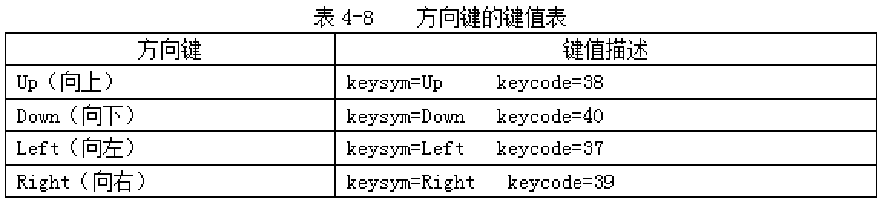
【例16】通过捕获键盘事件,在窗体中显示按下的键。
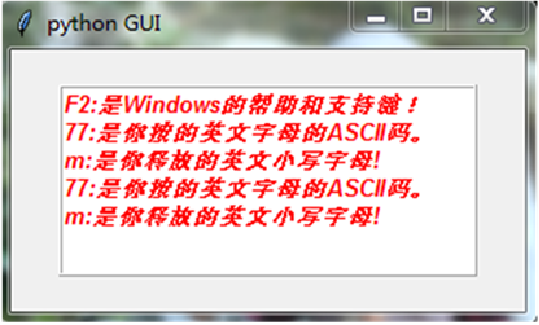
例 编写一个小程序,在顶层窗口里安放一个标签和两个按钮。初始时,标签内显示文字“请加载图片!”。单击“换图片”按钮,就往标签里加载图片。连续单击6次,标签里出现6张不同的图片,第7次单击时,又为第1张图片,周而复始;单击“退出”按钮,整个程序停止运行。
import tkinter as tk
top=tk.Tk()
top.title('python GUI')
top.geometry('200x200+10+10')
tup1=tk.PhotoImage(file = "E:\python图片夹\A.png")
tup2=tk.PhotoImage(file = "E:\python图片夹\B.png")
tup3=tk.PhotoImage(file = "E:\python图片夹\C.png")
tup4=tk.PhotoImage(file = "E:\python图片夹\D.png")
tup5=tk.PhotoImage(file = "E:\python图片夹\E.png")
tup6=tk.PhotoImage(file = "E:\python图片夹\F.png")
lab1=tk.Label(top,text='请加载图片!',font=('Verdana',16,'italic', 'bold'),fg='red',relief='ridge')
lab1.pack(pady=15)
i=1 #定义全局变量
def change():
global i
lab1.config(image=tup1
if i==1:
i+=1
lab1.config(image=tup2)
elif i==2:
i+=1
lab1.config(image=tup3)
elif i==3:
i+=1
lab1.config(image=tup4)
elif i==4:
i+=1
lab1.config(image=tup5)
elif i==5:
i+=1
lab1.config(image=tup6)
else:
i=1
button1=tk.Button(top,text='换图片',font=('楷体',13,'bold'),fg='red', command=change)
button1.pack(side='left',padx=20)
button2=tk.Button(top, text='退出',font=('楷体',13,'bold'),fg='red', command=quit)
button2.pack(side='left',padx=5)
top.mainloop()

