目录

  • 1 第一单元
    • 1.1 晶体衍射实验实践指导
    • 1.2 晶体学介绍
  • 2 晶体上样操作
    • 2.1 衍射实验-晶体上样及对心介绍
    • 2.2 晶体样品装样过程
    • 2.3 显微镜下的晶体挑选
    • 2.4 Synergy仪器的开关门及上样
    • 2.5 FRX仪器的开关门及上样
    • 2.6 大分子晶体预先冷冻上样方法
    • 2.7 晶体对心过程
  • 3 数据收集软件操作
    • 3.1 CrysAlispro-小分子数据采集
    • 3.2 CrysAlispro-大分子晶体粗筛设置
    • 3.3 晶体衍射实验仪器操作
    • 3.4 晶体衍射数据质量判定
  • 4 结构解析和精修
    • 4.1 结构解析介绍
    • 4.2 分析软件安装
    • 4.3 结构解析操作
    • 4.4 checkcif report生成
    • 4.5 CIF文件生成晶体学数据表
    • 4.6 蛋白晶体数据处理
    • 4.7 晶面指标化
    • 4.8 移除无序部分,保存为有序结构
    • 4.9 去除精修的限制命令
  • 5 checkcif回复及其修正
    • 5.1 412_ALERT_2_B修正
    • 5.2 PLAT342_ALERT_3_B回复
    • 5.3 THETM01_ALERT_3_A
    • 5.4 PLAT029_ALERT_3_A
    • 5.5 PLAT910_ALERT_3_B
    • 5.6 VRF回复方法
  • 6 审稿人意见回复案例
    • 6.1 实际案例1-限制与对称
  • 7 虚拟仿真实验
    • 7.1 虚拟仿真实验体验介绍
    • 7.2 虚拟仿真实验体验项目
  • 8 FAQ常见问题
    • 8.1 如何查看晶体结构?
    • 8.2 TwinRot不正常工作
    • 8.3 twin检测
    • 8.4 OLEX多个溶剂分子的输入格式
    • 8.5 如何生成二维衍射图片
    • 8.6 如何判断预实验结果的好坏?
  • 9 结晶实验操作
    • 9.1 结晶实验-结晶机器人操作
      • 9.1.1 结晶机器人操作
      • 9.1.2 结晶机器人关机步骤
      • 9.1.3 LCP设置不当与96板运行
      • 9.1.4 仪器未按照流程关机事故
  • 10 JAN UVEX-P 操作
    • 10.1 UVEX - P 操作步骤
UVEX - P 操作步骤

Operating Manual for UVEX-p

1 remove the cover and Turn on the UVEX-P

2 place the crystallization tray on the microscope stage

3 launch the control program CrystalDetect.

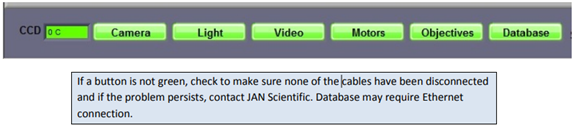
As the program initializes, it checks for the presence camera, light controller, motors, and database connection. On successful discovery, the corresponding buttons turn green.


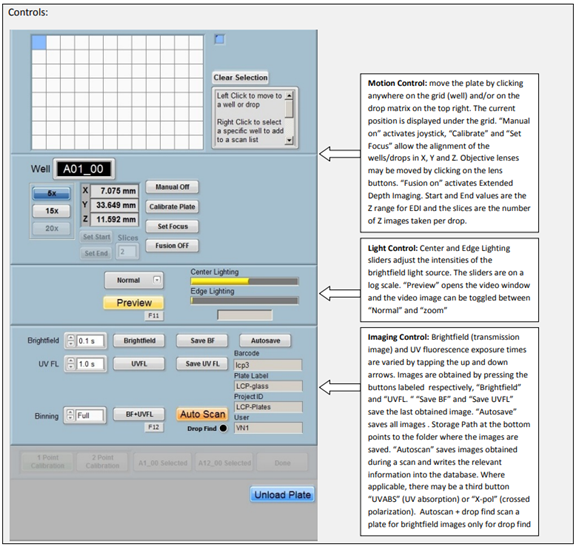
The X, Y & Z positions are homed and you will be asked to enter details about the plate, starting with the barcode.

4 Under “Plate” and select the appropriate correct plate type (VERY IMPORTANT!!!). Enter the user name by right clicking and selecting from the list or click Add New and add the newuser name in the pop-up window.

5 Click “Continue”and the plate will be moved to default X, Y and Z values set for that plate type.

6 load Plate and start your experiment.


6 Once your experiment is finished, click Unload plate.

7 Remove the crystallization tray on the microscope stage.

8 exit the program.

9 turn off and cover the instrument.