
3.2 工作任务二 主干网交换机的配置管理
【任务分析】
主干网中各种设备的配置是网络工程实施过程重要的环节之一,网络设备配置得当是保证整个校园网正常运行与管理的基本保障。
根据本校园网系统方案设计中的拓扑结构图,为便于教、学、做,从中抽取网络中最具代表性的部分,进行拓扑结构简化。在本任务中,使用如下图所示的拓扑,学习中型校园网骨干网中交换机的配置与管理。
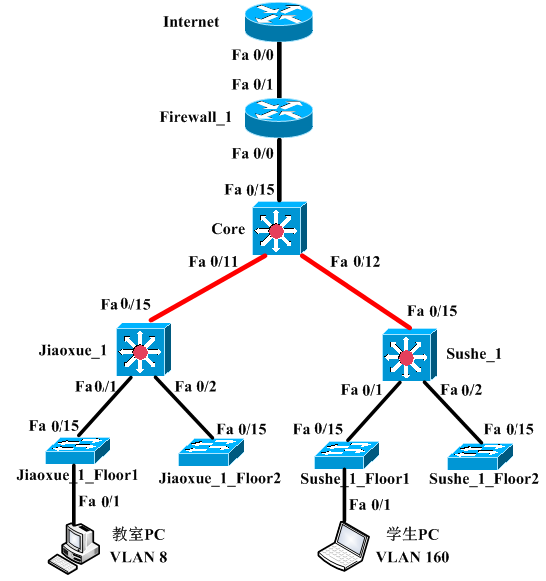
校园网主干网简化拓扑图
【任务要求】
任务名称 | 主干网交换机的配置与管理 |
任务目标 | 熟悉主干网中网络设备之间互联接口规划,IP地址分配,设备配置规划等 |
学习方式与工具 | 网络设备实训室、三层交换机及二层交换机若干、网络线缆若干,或思科模拟器等 |
相关知识 | 主干网设备互联规划及配置。 |
工作任务 | (1)根据网络系统方案,规划设计主干网设备之间互联。 (2)接入层设备配置 (3)汇聚层设备配置 (4)核心层设备配置 |
完成任务和成果 | 主干网设备之间互联规划,主要设备配置文档 |
3.2.1主干网中设备互联规划
根据下图的校园网精简拓扑,核心交换机的F0/11、F0/12、F 0/15,教学楼和学生宿舍汇聚交换机的F 0/15接口使用三层模式互联。所有交换机的其他端口均为二层模式。
教学楼有8个VLAN,VLAN 8–15;学生宿舍楼也有8个VLAN,VLAN 160–167。VLAN的网段均为172.16.x.0/24,其中x为VLAN ID。教室PC位于VLAN 8,学生PC位于VLAN 160。所有设备的接口连接和IP地址规划表见下表。
本端设备 | 设备描述 | 本端接口 | IP地址/前缀 | 对端设备 | 对端接口 |
Core | 老校区核心交换机 | FastEthernet 0/11 | 172.16.0.1/30 | Jiaoxue_1 | FastEthernet 0/15 |
FastEthernet 0/12 | 172.16.0.5/30 | Sushe_1 | FastEthernet 0/15 | ||
FastEthernet 0/15 | 172.31.0.9/30 | Firewall_1 | FastEthernet 0/0 | ||
Firewall_1 | 老校区出口防火墙 | FastEthernet 0/0 | 172.31.0.10/30 | Core | FastEthernet 0/15 |
FastEthernet 0/1 | 219.1.2.2/26 | Internet | FastEthernet 0/0 | ||
Internet | 模拟Internet的路由器 | FastEthernet 0/0 | 219.1.2.1/26 | Firewall_1 | FastEthernet 0/1 |
Jiaoxue_1 | 教学楼-1汇聚交换机 | FastEthernet0/15 | 172.16.0.2/30 | 教学楼-1 的用户VLAN | |
| Vlan-Interface 8 | 172.16.8.1/24 | ||||
| Vlan-interface 9 | 172.16.9.1/24 | ||||
| Vlan-interface 10 | 172.16.10.1/24 | ||||
| Vlan-interface 11 | 172.16.11.1/24 | ||||
| Vlan-interface 12 | 172.16.12.1/24 | ||||
| Vlan-interface 13 | 172.16.13.1/24 | ||||
| Vlan-interface 14 | 172.16.14.1/24 | ||||
| Vlan-interface 15 | 172.16.15.1/24 | ||||
Sushe_1 | 学生宿舍-1汇聚交换机 | FastEthernet 0/15 | 172.16.0.6/30 | 学生宿舍-1 的用户VLAN | |
Vlan-Interface 160 | 172.16.160.1/24 | ||||
| Vlan-Interface 161 | 172.16.161.1/24 | ||||
| Vlan-Interface 162 | 172.16.162.1/24 | ||||
| Vlan-Interface 163 | 172.16.163.1/24 | ||||
| Vlan-Interface 164 | 172.16.164.1/24 | ||||
| Vlan-Interface 165 | 172.16.165.1/24 | ||||
| Vlan-Interface 166 | 172.16.166.1/24 | ||||
| Vlan-Interface 167 | 172.16.167.1/24 | ||||
交换机二层模式端口的工作模式和允许的VLAN列表
| 交换机主机名 | 端口 | 工作模式 | 允许的VLAN列表 |
Jiaoxue_1 | FastEthernet 0/1 | trunk | 8,9,10,11 |
FastEthernet 0/2 | trunk | 12,13,14,15 | |
Sushe_1 | FastEthernet 0/1 | trunk | 160,161,162,163 |
FastEthernet 0/2 | trunk | 164,165,166,167 | |
Jiaoxue_1_Floor1 | FastEthernet 0/15 | trunk | 8,9,10,11 |
FastEthernet 0/1 | access | 8 | |
8FastEthernet 0/2 | access | 9 | |
FastEthernet 0/3 | access | 10 | |
FastEthernet 0/4 | access | 11 | |
Jiaoxue_1_Floor2 | FastEthernet 0/15 | trunk | 12,13,14,15 |
FastEthernet 0/1 | access | 12 | |
FastEthernet 0/2 | access | 13 | |
FastEthernet 0/3 | access | 14 | |
FastEthernet 0/4 | access | 15 | |
| Sushe_1_Floor1 | FastEthernet 0/15 | trunk | 160,161,162,163 |
FastEthernet 0/1 | access | 160 | |
FastEthernet 0/2 | access | 161 | |
FastEthernet 0/3 | access | 162 | |
FastEthernet 0/4 | access | 163 | |
Sushe_1_Floor2 | FastEthernet 0/15 | trunk | 164,165,166,167 |
FastEthernet 0/1 | access | 164 | |
FastEthernet 0/2 | access | 165 | |
FastEthernet 0/3 | access | 166 | |
FastEthernet 0/4 | access | 167 |
3.2.2 VLAN及VLAN间通信配置
1.配置路由器和交换机三层接口的IP地址
下面以交换机Core的FastEthernet 0/15接口为例,介绍将交换机端口模式更改为三层模式并配置IP地址的过程。
Core(config)#ip routing 启用交换机的路由转发功能,默认为禁用
Core(config)#interface fastEthernet 0/15
Core(config-if)#no switchport 将接口配置为三层模式
Core(config-if)#ip address 172.31.0.9 255.255.255.252 设置三层接口IP地址
Core(config-if)#exit
使用show vlan-switch brief命令,可以查看交换机上存在的VLAN,以及VLAN和交换机端口的对应关系。
Jiaoxue_1#show vlan-switch brief
VLAN Name Status Ports
---- -------------------------------- --------- -------------------------------
1 default active Fa1/0, Fa1/1, Fa1/2, Fa1/3
Fa1/4, Fa1/5, Fa1/6, Fa1/7
Fa1/8, Fa1/9, Fa1/10, Fa1/11
Fa1/12, Fa1/13, Fa1/14, Fa1/15
8 Jiaoshi active
9 Shiyanshi active
按照前表中的VLAN规划,为其他交换机创建相应的VLAN。
注意不要为交换机创建多余的VLAN,否则可能会引起广播流量的泛滥和安全问题。VLAN之间的路由在各自的汇聚层交换机上实现。
3.为Access模式的端口分配VLAN
按照前表中的交换机端口的工作模式和允许的VLAN列表,为接入用户的所有Access模式的端口分配VLAN。下面以教学楼一层交换机端口FastEthernet 1/1为例介绍配置过程。
Jiaoxue_1_Floor1(config)#interface fastEthernet 1/1
Jiaoxue_1_Floor1(config-if)#switchport mode access 配置端口的工作模式为Access模式
Jiaoxue_1_Floor1(config-if)#switchport access vlan 8 指定该端口允许的VLAN
Jiaoxue_1_Floor1(config-if)#exit
4.配置Trunk模式的端口并指定端口允许的VLAN列表
按照前表中的交换机端口的工作模式和允许的VLAN列表,将交换机之间相连的级联端口配置为Trunk模式,并指定端口允许的VLAN列表。
(1)配置教学楼汇聚交换机Jiaoxue_1的Trunk端口
Jiaoxue_1(config)#interface fastEthernet 0/1
Jiaoxue_1(config-if)#switchport trunk encapsulation dot1q
Jiaoxue_1(config-if)#switchport mode trunk
!配置将端口允许的VLAN列表去掉VLAN12、13、14、15。
Jiaoxue_1(config-if)#switchport trunk allowed vlan remove 12-15
Jiaoxue_1(config-if)#exit
为避免将广播流量泛洪到不必要的VLAN,在配置Trunk模式的端口时,需要注意配置的合理性,不允许不必要的VLAN通过。在实验练习中,默认通过所有VLAN这样配置通常没有问题,但是在实际工程中,这种配置方式是不可取的。
以汇聚层交换机Jiaoxue_1为例,该交换机上存在VLAN 8-15共8个VLAN。而接入层交换机Jiaoxue_1_Floor1上只存在VLAN 8-11共4个VLAN。如果将交换机Jiaoxue_1的FastEthernet 1/1端口配置为Trunk模式,但没有删除端口上允许的VLAN 12-15,那么来自交换机Jiaoxue_1的VLAN 12-15这4个VLAN的广播流量就会泛洪到交换机Jiaoxue_1_Floor1,而这些数据对于交换机Jiaoxue_1_Floor1来说是垃圾数据。这样,既浪费了带宽资源,也带来了安全隐患。
(2)查看端口的二层配置信息
使用下面的命令查看交换机Jiaoxue_1的FastEthernet 1/1和FastEthernet 1/2端口的二层配置信息。以FastEthernet 1/1为例,查看接口配置信息如下:
Jiaoxue_1#show interfaces fastEthernet 0/1 switchport
Name: Fa1/1
Switchport: Enabled # 端口工作在二层
Administrative Mode: trunk # 配置文件中的端口模式
Operational Mode: trunk # 端口的实际运行模式
Administrative Trunking Encapsulation: dot1q # 配置文件中的端口Trunk封装
Operational Trunking Encapsulation: dot1q # 端口实际运行的Trunk封装
Negotiation of Trunking: Disabled
Access Mode VLAN: 0 ((Inactive))
Trunking Native Mode VLAN: 1 (default)
Trunking VLANs Enabled: 1-11,16-1005 # 端口允许的VLAN列表
Trunking VLANs Active: 1,8-11 # 端口允许的活动VLAN列表
Priority for untagged frames: 0
Override vlan tag priority: FALSE
Voice VLAN: none
Appliance trust: none
从端口允许的活动VLAN列表中,可以看到该端口只允许VLAN 1、8-11。思科交换机某些协议的正常运作会使用到VLAN 1,所以VLAN 1可以不用删除。
(3)配置学生宿舍楼汇聚交换机
以下为学生宿舍楼汇聚交换机Sushe_1的Trunk模式端口配置。
Sushe_1(config)#interface fastEthernet 0/1
Sushe_1(config-if)#switchport trunk encapsulation dot1q
Sushe_1(config-if)#switchport mode trunk
Sushe_1(config-if)#switchport trunk allowed vlan remove 164-167
Sushe_1(config-if)#exit
Sushe_1(config)#interface fastEthernet 0/2
Sushe_1(config-if)#switchport trunk encapsulation dot1q
Sushe_1(config-if)#switchport mode trunk
Sushe_1(config-if)#switchport trunk allowed vlan remove 160-163
Sushe_1(config-if)#exit
(4)配置接入层交换机的Trunk模式端口
以下以交换机Jiaoxue_1_Floor1为例,说明接入层交换机的Trunk端口配置方法。
Jiaoxue_1_Floor1(config)#interface fastEthernet 0/15
Jiaoxue_1_Floor1(config-if)#switchport trunk encapsulation dot1q
Jiaoxue_1_Floor1(config-if)#switchport mode trunk
Jiaoxue_1_Floor1(config-if)#exit
由于交换机Jiaoxue_1_Floor1上只存在VLAN 8-11这4个VLAN,所以就不再需要为Trunk端口删除VLAN了。其他三台交换机的配置与交换机Jiaoxue_1_Floor1相似。
5.在汇聚层交换机上配置VLAN间路由
在教学楼汇聚交换机和学生宿舍楼汇聚交换机上配置VLAN间路由,其中教学楼汇聚交换机Jiaoxue_1中需要创建VLAN 8-15共8个VLAN的VLAN SVI接口,学生宿舍楼汇聚交换机上Sushe_1中需要创建VLAN 160-167共8个VLAN的VLAN SVI接口。下面以交换机Jiaoxue_1的VLAN 8 SVI接口为例,说明VLAN间路由的配置方法。
Jiaoxue_1(config)#interface vlan 8
Jiaoxue_1(config-if)#ip address 172.16.8.1 255.255.255.0
Jiaoxue_1(config-if)#exit
注意,某些型号的交换机在创建了VLAN SVI接口后,该接口可能处于管理禁用状态,需要输入no shutdown命令,手工启用该VLAN SVI接口。
当为交换机创建了所有的VLAN SVI接口之后,只要下联的Trunk端口为up状态,这些VLAN的SVI接口都会up,并出现在交换机的路由表中,表现为直连路由。
6.为接入层交换机配置管理IP地址
路由器接口IP地址、三层交换机的VLAN SVI接口地址都可以作为设备的远程管理地址,但是二层交换机不需要配置IP地址,所以现在无法对其进行管理管理。下面以交换机Jiaoxue_1_Floor1为例,介绍管理IP地址的配置方法。
Jiaoxue_1_Floor1(config)#interface vlan 8
Jiaoxue_1_Floor1(config-if)#ip address 172.16.8.254 255.255.255.0 !配置管理IP地址
Jiaoxue_1_Floor1(config-if)#exit
Jiaoxue_1_Floor1(config)#ip default-gateway 172.16.8.1 !配置默认网关
对二层交换机来说,可以在其所管辖的某个VLAN中选择一个IP地址作为管理IP地址。为了让该IP地址能被其他的网段访问,需要为二层交换机配置默认网关,指向汇聚交换机。
3.2.3静态路由配置
1.配置默认路由
局域网通常需要连接Internet,因此局域网内所有的三层设备都需要默认路由。默认路由有两种配置方法,一种是配置静态的默认路由,另一种是通过动态路由协议传播默认路由。
静态默认路由是在三层设备上手工配置指向0.0.0.0/0的静态路由,这种方式适合于规模较小、拓扑简单的局域网。若网络规模较大,或网络内存在网状拓扑,则适合使用动态路由传播默认路由,本项目适合配置静态默认路由。
以下是交换机Jiaoxue_1、Sushe_1的静态默认路由配置。
Jiaoxue_1(config)#ip route 0.0.0.0 0.0.0.0 172.16.0.1
Sushe_1(config)#ip route 0.0.0.0 0.0.0.0 172.16.0.5
交换机Jiaoxue_1和Sushe_1都是末节设备,只需要一条默认路由即可让设备的内部网络访问整个校园网和Internet,不再需要配置其他的静态路由。交换机Core和防火墙Firewall_1上需要配置静态路由,路由器Internet现在不需要配置任何静态路由。
2.配置静态路由
为交换机Core和路由器Firewall_1配置静态路由,指向局域网内部的其他地址段。其中,教学楼-1的8个网段能够聚合为172.16.8.0/21,学生宿舍楼-1的8个网段能够聚合为172.16.160.0/21,因此可以在交换机Core上配置聚合的静态路由。
Core(config)#ip route 172.16.8.0 255.255.248.0 172.16.0.2
Core(config)#ip route 172.16.160.0 255.255.248.0 172.16.0.6
Firewall_1(config)#ip route 172.16.0.0 255.255.0.0 172.31.0.9
整个校园网地址范围为主网172.16.0.0/16,因此在路由器Firewall_1上配置指向这个主网的一条静态路由就可以了。
3.测试网络连通性
(1)查看每台设备的路由表
①查看出口防火墙Firewall_1的路由表
Firewall_1#show ip route
Gateway of last resort is 219.1.2.1 to network 0.0.0.0
219.1.2.0/26 is subnetted, 1 subnets
C 219.1.2.0 is directly connected, FastEthernet0/1
S 172.16.0.0/16 [1/0] via 172.31.0.9
172.31.0.0/30 is subnetted, 1 subnets
C 172.31.0.8 is directly connected, FastEthernet0/0
S* 0.0.0.0/0 [1/0] via 219.1.2.1
②查看核心交换机Core的路由表
Core#showip route
Gateway of last resort is 172.31.0.10 to network 0.0.0.0
172.16.0.0/16 is variably subnetted, 4 subnets, 2 masks
S 172.16.160.0/21 [1/0] via 172.16.0.6
S 172.16.8.0/21 [1/0] via 172.16.0.2
C 172.16.0.4/30 is directly connected, FastEthernet1/12
C 172.16.0.0/30 is directly connected, FastEthernet1/11
172.31.0.0/30 is subnetted, 1 subnets
C 172.31.0.8 is directly connected, FastEthernet1/15
S* 0.0.0.0/0 [1/0] via 172.31.0.10
③查看教学楼-1汇聚交换机Jiaoxue_1的路由表
Jiaoxue_1#show ip route
Gateway of last resort is 172.16.0.1 to network 0.0.0.0
172.16.0.0/16 is variably subnetted, 9 subnets, 2 masks
C 172.16.12.0/24 is directly connected, Vlan12
C 172.16.13.0/24 is directly connected, Vlan13
C 172.16.14.0/24 is directly connected, Vlan14
C 172.16.15.0/24 is directly connected, Vlan15
C 172.16.8.0/24 is directly connected, Vlan8
C 172.16.9.0/24 is directly connected, Vlan9
C 172.16.10.0/24 is directly connected, Vlan10
C 172.16.11.0/24 is directly connected, Vlan11
C 172.16.0.0/30 is directly connected, FastEthernet1/15
S* 0.0.0.0/0 [1/0] via 172.16.0.1
④查看学生宿舍楼-1汇聚交换机Sushe_1的路由表
Sushe_1#show ip route
Gateway of last resort is 172.16.0.5 to network 0.0.0.0
172.16.0.0/16 is variably subnetted, 9 subnets, 2 masks
C 172.16.164.0/24 is directly connected, Vlan164
C 172.16.165.0/24 is directly connected, Vlan165
C 172.16.166.0/24 is directly connected, Vlan166
C 172.16.167.0/24 is directly connected, Vlan167
C 172.16.160.0/24 is directly connected, Vlan160
C 172.16.161.0/24 is directly connected, Vlan161
C 172.16.162.0/24 is directly connected, Vlan162
C 172.16.163.0/24 is directly connected, Vlan163
C 172.16.0.4/30 is directly connected, FastEthernet1/15
S* 0.0.0.0/0 [1/0] via 172.16.0.5
(2)测试网络的连通性
从教室PC访问老校区局域网内部的任意一个地址,例如:
ping 172.16.160.2
172.16.160.2 icmp_seq=1 ttl=61 time=140.400 ms
172.16.160.2 icmp_seq=2 ttl=61 time=202.800 ms
ping 172.31.0.10
172.31.0.10 icmp_seq=1 ttl=253 time=171.600 ms
172.31.0.10 icmp_seq=2 ttl=253 time=109.200 ms
现在,本校园网内部网络已经全部连通。但是校园网内用户现在还不能访问Internet,要使校园网内用户访问Internet,需要配置网络地址转换(NAT)。
【任务归纳】
通过本任务的学习与实践技能训练,熟练掌握中型网络中主干网设备之间的互联设计、VLAN规划与IP地址分配、VLAN的创建及VLAN间通信,以及静态路由的配置等。

