
一、HTTP协议简介
HTTP(Hyper Text Transfer Protocol)协议即超文本传输协议,它规定了浏览器和万维网服务器之间互相通信的规则。
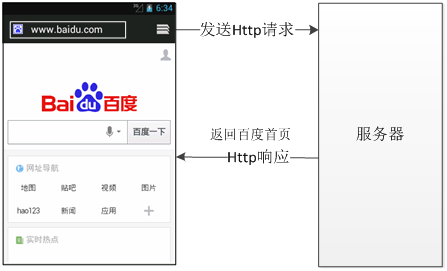
从图中可以看出,使用手机客户端访问百度时,会发送一个HTTP请求。当服务器端接收到这个请求后,会做出响应并将百度页面返回给客户端浏览器。这个请求和响应的过程实际上就是HTTP通信的过程。
二、通过HTTP访问网络
1、使用HttpURLConnection访问网络
要创建一个http://www.gist-edu.cn/网站对应的HttpURLConnection对象,可以使用下面的代码。
URLurl= new URL("http://www.gist-edu.cn/");
HttpURLConnectionurlConnection= (HttpURLConnection)url.openConnection();
a.发送GET请求
要传递用户名和E-mail地址两个参数可以使用下面代码实现。
?user=wgh,email=mingrisoft@mingrisoft.com
在Eclipse中创建Android项目,实现向服务器发送GET请求,并获取服务器的响应结果。

布局文件:
<LinearLayout xmlns:android="http://schemas.android.com/apk/res/android"
android:layout_width="match_parent"
android:layout_height="match_parent"
android:gravity="center_horizontal"
android:orientation="vertical" >
<EditText
android:id="@+id/content"
android:layout_width="match_parent"
android:layout_height="wrap_content" />
<Button
android:id="@+id/button"
android:layout_width="wrap_content"
android:layout_height="wrap_content"
android:text="@string/button" />
<ScrollView
android:id="@+id/scrollView1"
android:layout_width="match_parent"
android:layout_height="wrap_content"
android:layout_weight="1" >
<LinearLayout
android:id="@+id/linearLayout1"
android:layout_width="match_parent"
android:layout_height="match_parent" >
<TextView
android:id="@+id/result"
android:layout_width="match_parent"
android:layout_height="wrap_content"
android:layout_weight="1" />
</LinearLayout>
</ScrollView>
</LinearLayout>
界面实现:
public class MainActivity extends Activity {
private EditText content; //声明一个输入文本内容的编辑框对象
private Button button; //声明一个发表按钮对象
private Handler handler; // 声明一个Handler对象
private String result = ""; //声明一个代表显示内容的字符串
private TextView resultTV; //声明一个显示结果的文本框对象
@Override
protected void onCreate(Bundle savedInstanceState) {
super.onCreate(savedInstanceState);
setContentView(R.layout.activity_main);
content = (EditText) findViewById(R.id.content); //获取输入文本内容的EditText组件
resultTV = (TextView) findViewById(R.id.result); //获取显示结果的TextView组件
button = (Button) findViewById(R.id.button); //获取“发表”按钮组件
//为按钮添加单击事件监听器
button.setOnClickListener(new OnClickListener() {
@Override
public void onClick(View v) {
if ("".equals(content.getText().toString())) {
Toast.makeText(MainActivity.this, "请输入要发表的内容!",
Toast.LENGTH_SHORT).show(); //显示消息提示
return;
}
// 创建一个新线程,用于发送并读取微博信息
new Thread(new Runnable() {
public void run() {
send(); //发送文本内容到Web服务器,并读取
Message m = handler.obtainMessage(); // 获取一个Message
handler.sendMessage(m); // 发送消息
}
}).start(); // 开启线程
}
});
handler = new Handler() {
@Override
public void handleMessage(Message msg) {
if (result != null) {
resultTV.setText(result); // 显示获得的结果
content.setText(""); // 清空编辑框
}
super.handleMessage(msg);
}
};
}
public void send() {
String target="";
target = "http://192.168.1.66:8080/blog/index.jsp?content="
+base64(content.getText().toString().trim()); //要访问的URL地址
URL url;
try {
url = new URL(target); // 创建URL对象
HttpURLConnection urlConn = (HttpURLConnection) url
.openConnection(); //创建一个HTTP连接
InputStreamReader in = new InputStreamReader(
urlConn.getInputStream()); // 获得读取的内容
BufferedReader buffer = new BufferedReader(in); // 获取输入流对象
String inputLine = null;
//通过循环逐行读取输入流中的内容
while ((inputLine = buffer.readLine()) != null) {
result += inputLine + "\n";
}
in.close(); //关闭字符输入流对象
urlConn.disconnect(); //断开连接
} catch (MalformedURLException e) {
e.printStackTrace();
} catch (IOException e) {
e.printStackTrace();
}
}
public String base64(String content){
try {
//对字符串进行Base64编码
content=Base64.encodeToString(content.getBytes("utf-8"), Base64.DEFAULT);
content=URLEncoder.encode(content); //对字符串进行URL编码
} catch (UnsupportedEncodingException e) {
e.printStackTrace(); //输出异常信息
}
return content;
}
@Override
public boolean onCreateOptionsMenu(Menu menu) {
// Inflate the menu; this adds items to the action bar if it is present.
getMenuInflater().inflate(R.menu.main, menu);
return true;
}
@Override
public boolean onOptionsItemSelected(MenuItem item) {
// Handle action bar item clicks here. The action bar will
// automatically handle clicks on the Home/Up button, so long
// as you specify a parent activity in AndroidManifest.xml.
int id = item.getItemId();
if (id == R.id.action_settings) {
return true;
}
return super.onOptionsItemSelected(item);
}
}
b.发送POST请求
创建一个HTTP连接,并为该连接指定请求的发送方式为POST,可以使用下面的代码。
//创建一个HTTP连接
HttpURLConnectionurlConn= (HttpURLConnection)url.openConnection();
urlConn.setRequestMethod("POST"); //指定请求方式为POST
发送POST请求时常用的方法:
| 方法 | 描述 |
| setDoInput(booleannewValue) | 用于设置是否向连接中写入数据,如果参数值为true时,表示写入数据,否则不写入数据 |
| setDoOutput(boolean newValue) | 用于设置是否从连接中读取数据,如果参数值为true时,表示读取数据,否则不读取数据 |
| setUseCaches(boolean newValue) | 用于设置是否缓存数据,如果参数值为true,表示缓存数据,否则表示禁用缓存 |
| setInstanceFollowRedirects(boolean followRedirects) | 用于设置是否应该自动执行HTTP重定向,参数值为true时,表示自动执行,否则不自动执行 |
| setRequestProperty(String field, String newValue) | 用于设置一般请求属性,例如,要设置内容类型为表单数据,可以进行以下设置setRequestProperty("Content-Type","application/x-www-form-urlencoded") |
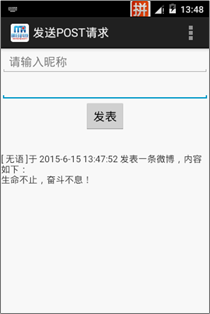
在Eclipse中创建Android项目,实现向服务器发送POST请求,并获取服务器的响应结果。
布局文件:
<LinearLayout xmlns:android="http://schemas.android.com/apk/res/android"
android:orientation="vertical"
android:gravity="center_horizontal"
android:layout_width="match_parent"
android:layout_height="match_parent">
<EditText
android:id="@+id/nickname"
android:hint="@string/nickname"
android:layout_width="match_parent"
android:layout_height="wrap_content" >
</EditText>
<EditText
android:id="@+id/content"
android:layout_height="wrap_content"
android:layout_width="match_parent"
android:inputType="textMultiLine"/>
<Button
android:id="@+id/button"
android:layout_width="wrap_content"
android:layout_height="wrap_content"
android:text="@string/button" />
<ScrollView
android:id="@+id/scrollView1"
android:layout_width="match_parent"
android:layout_height="wrap_content"
android:layout_weight="1" >
<LinearLayout
android:id="@+id/linearLayout1"
android:layout_width="match_parent"
android:layout_height="match_parent" >
<TextView
android:id="@+id/result"
android:layout_width="match_parent"
android:layout_height="wrap_content"
android:layout_weight="1" />
</LinearLayout>
</ScrollView>
</LinearLayout>
界面实现:
public class MainActivity extends Activity {
private EditText nickname; //声明一个输入昵称的编辑框对象
private EditText content; //声明一个输入文本内容的编辑框对象
private Button button; //声明一个发表按钮对象
private Handler handler; //声明一个Handler对象
private String result = ""; //声明一个代表显示内容的字符串
private TextView resultTV; //声明一个显示结果的文本框对象
@Override
protected void onCreate(Bundle savedInstanceState) {
super.onCreate(savedInstanceState);
setContentView(R.layout.activity_main);
content = (EditText) findViewById(R.id.content);//获取输入文本内容的EditText
resultTV = (TextView) findViewById(R.id.result);//获取显示结果的TextView组件
nickname=(EditText)findViewById(R.id.nickname); //获取输入昵称的EditText组件
button = (Button) findViewById(R.id.button);//获取“发表”按钮组件
//为按钮添加单击事件监听器
button.setOnClickListener(new OnClickListener() {
@Override
public void onClick(View v) {
if ("".equals(content.getText().toString())) {
Toast.makeText(MainActivity.this, "请输入要发表的内容!",Toast.LENGTH_SHORT).show();
return;
}
// 创建一个新线程,用于发送并读取微博信息
new Thread(new Runnable() {
public void run() {
send();
Message m = handler.obtainMessage(); // 获取一个Message
handler.sendMessage(m); // 发送消息
}
}).start(); // 开启线程
}
});
handler = new Handler() {
@Override
public void handleMessage(Message msg) {
if (result != null) {
resultTV.setText(result); // 显示获得的结果
content.setText(""); // 清空内容编辑框
nickname.setText(""); // 清空昵称编辑框
}
super.handleMessage(msg);
}
};
}
public void send() {
String target = "http://192.168.1.66:8080/blog/dealPost.jsp";//要提交的目标地址
URL url;
try {
url = new URL(target);
HttpURLConnection urlConn = (HttpURLConnection) url
.openConnection(); // 创建一个HTTP连接
urlConn.setRequestMethod("POST"); // 指定使用POST请求方式
urlConn.setDoInput(true); // 向连接中写入数据
urlConn.setDoOutput(true); // 从连接中读取数据
urlConn.setUseCaches(false); // 禁止缓存
urlConn.setInstanceFollowRedirects(true); // 自动执行HTTP重定向
urlConn.setRequestProperty("Content-Type",
"application/x-www-form-urlencoded"); // 设置内容类型
DataOutputStream out = new DataOutputStream(
urlConn.getOutputStream()); // 获取输出流
//连接要提交的数据
String param = "nickname="
+ URLEncoder.encode(nickname.getText().toString(), "utf-8")
+ "&content="
+ URLEncoder.encode(content.getText().toString(), "utf-8");
out.writeBytes(param); //将要传递的数据写入数据输出流
out.flush(); //输出缓存
out.close(); //关闭数据输出流
// 判断是否响应成功
if (urlConn.getResponseCode() == HttpURLConnection.HTTP_OK) {
InputStreamReader in = new InputStreamReader(
urlConn.getInputStream()); // 获得读取的内容
BufferedReader buffer = new BufferedReader(in); // 获取输入流对象
String inputLine = null;
while ((inputLine = buffer.readLine()) != null) {
result += inputLine + "\n";
}
in.close(); //关闭字符输入流
}
urlConn.disconnect(); //断开连接
} catch (MalformedURLException e) {
e.printStackTrace();
} catch (IOException e) {
e.printStackTrace();
}
}
@Override
public boolean onCreateOptionsMenu(Menu menu) {
// Inflate the menu; this adds items to the action bar if it is present.
getMenuInflater().inflate(R.menu.main, menu);
return true;
}
@Override
public boolean onOptionsItemSelected(MenuItem item) {
// Handle action bar item clicks here. The action bar will
// automatically handle clicks on the Home/Up button, so long
// as you specify a parent activity in AndroidManifest.xml.
int id = item.getItemId();
if (id == R.id.action_settings) {
return true;
}
return super.onOptionsItemSelected(item);
}
}

