
一、SharedPreferences
SharedPreferences接口位于android.content包中,用于使用键值(key-value)对的方式来存储数据。
通常情况下,可以通过以下两种方式获得SharedPreferences对象。
使用getSharedPreferences()方法获取
getSharedPreferences(Stringname, intmode)
使用getPreferences()方法获取
(1)调用SharedPreferences类的edit()方法获得SharedPreferences.Editor对象。例如,可以使用下面的代码获取获得私有类型的SharedPreferences.Editor对象。
SharedPreferences.Editor editor=getSharedPreferences("mr",MODE_PRIVATE).edit();
(2)向SharedPreferences.Editor对象中添加数据。例如,调用putBoolean()方法添加布尔型数据、调用putString()方法添加字符串数据、调用putInt()方法添加整型数据,可以使用下面的代码。
editor.putString("username",username);
editor.putBoolean("status",false);
editor.putInt("age",20);
(3)使用commit()方法提交数据,从而完成数据存储操作。
总结使用步骤:
1、得到SharedPreferences对象
2、调用SharedPreferences对象的edit()方法来获取一个SharedPreferences.Editor对象。
3、向SharedPreferences.Editor对象中添加数据。
4、调用commit()方法将添加的数据提交。
获取数据时
SharedPreferencessp = getSharedPreferences("mr",MODE_PRIVATE);
Stringusername = sp.getString("username","mr");//获得用户名
Booleanstatus = sp.getBoolean("status",false);
int age= sp.getInt("age",18);
删除保存在文件中的数据时
SharedPreferences.Editoreditor=getSharedPreferences("mr",MODE_PRIVATE).edit();
editor.remove(“username”); //删除一条数据
editor.clear(); //删除所有数据
editor.commit(); //提交修改
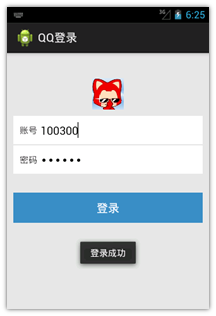
二、案例-QQ登录
大多数人使用电脑第一件事基本上都是登录QQ,为了方便,大家通常会使用记住密码功能,直接点击登录按钮即可完成登录功能。
在Android手机中,同样可以实现这个功能,接下来通过一个“QQ登录”的案例来演示如何使用SharedPreferences存储数据。
布局文件如下:
<RelativeLayout xmlns:android="http://schemas.android.com/apk/res/android"
xmlns:tools="http://schemas.android.com/tools"
android:layout_width="match_parent"
android:layout_height="match_parent"
android:background="#E6E6E6"
android:orientation="vertical" >
<ImageView
android:id="@+id/iv_head"
android:layout_width="50dp"
android:layout_height="50dp"
android:layout_centerHorizontal="true"
android:layout_marginTop="40dp"
android:src="@drawable/ic_launcher" />
<LinearLayout
android:id="@+id/layout"
android:layout_width="match_parent"
android:layout_height="wrap_content"
android:layout_below="@+id/iv_head"
android:layout_margin="10dp"
android:background="#ffffff"
android:orientation="vertical" >
<RelativeLayout
android:id="@+id/rl_username"
android:layout_width="match_parent"
android:layout_height="wrap_content"
android:layout_margin="10dp" >
<TextView
android:id="@+id/tv_name"
android:layout_width="wrap_content"
android:layout_height="wrap_content"
android:layout_centerVertical="true"
android:text="账号" />
<EditText
android:id="@+id/et_number"
android:layout_width="match_parent"
android:layout_height="wrap_content"
android:layout_marginLeft="5dp"
android:layout_toRightOf="@+id/tv_name"
android:background="@null" />
</RelativeLayout>
<View
android:layout_width="match_parent"
android:layout_height="2dp"
android:background="#E6E6E6" />
<RelativeLayout
android:id="@+id/rl_userpsw"
android:layout_width="match_parent"
android:layout_height="wrap_content"
android:layout_margin="10dp" >
<TextView
android:id="@+id/tv_psw"
android:layout_width="wrap_content"
android:layout_height="wrap_content"
android:layout_centerVertical="true"
android:text="密码" />
<EditText
android:id="@+id/et_password"
android:layout_width="match_parent"
android:layout_height="wrap_content"
android:layout_marginLeft="5dp"
android:layout_toRightOf="@+id/tv_psw"
android:inputType="textPassword"
android:background="@null" />
</RelativeLayout>
</LinearLayout>
<Button
android:id="@+id/btn_login"
android:layout_width="match_parent"
android:layout_height="wrap_content"
android:layout_below="@+id/layout"
android:layout_centerHorizontal="true"
android:layout_marginLeft="10dp"
android:layout_marginRight="10dp"
android:layout_marginTop="20dp"
android:background="#3C8DC4"
android:text="登录"
android:textColor="#ffffff" />
</RelativeLayout>
java代码如下:
public void onClick(View v) {
// 当点击登录时,获取QQ号码 和密码
String number = etNumber.getText().toString().trim();
String password = etPassword.getText().toString();
// 校验号码和密码是否正确
if(TextUtils.isEmpty(number)) {
Toast.makeText(this, "请输入QQ号码", Toast.LENGTH_SHORT).show();
return;
}
if(TextUtils.isEmpty(password)) {
Toast.makeText(this, "请输入密码", Toast.LENGTH_SHORT).show();
return;
}
// 登录成功
Toast.makeText(this, "登录成功", Toast.LENGTH_SHORT).show();
// 保存用户信息
boolean isSaveSuccess = Utils.saveUserInfo(this, number, password);
if(isSaveSuccess) {
Toast.makeText(this, "保存成功", Toast.LENGTH_SHORT).show();
} else {
Toast.makeText(this, "保存失败", Toast.LENGTH_SHORT).show();
}
}

